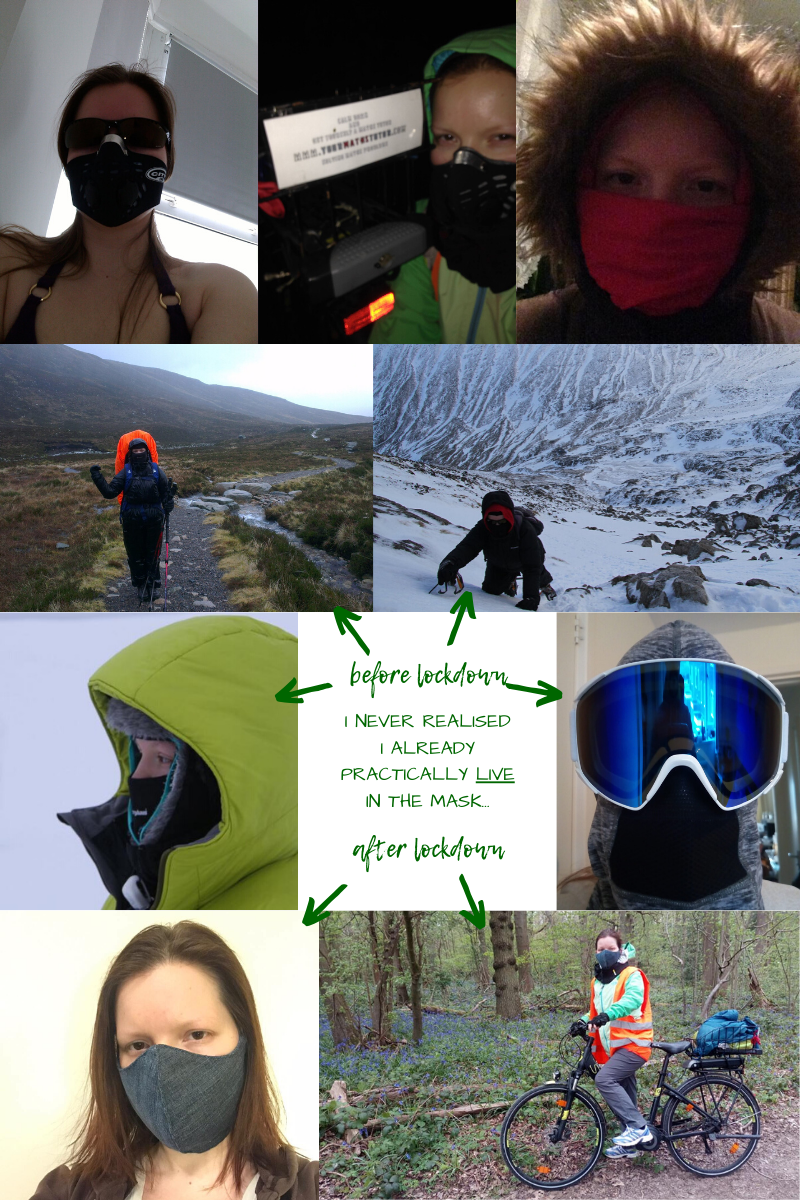
Hi there, it's Veronika, in case you didn't recognise me with my hand-stitched face mask on - who'd guess that coronavirus will be dictating us what to wear...
So it has come to that - I'm talking coronavirus on my blog. I guess there's not much way around it. Let's cut to the chase, I'm going to write about how to make your own face mask. You don't need a sewing machine, just basic sewing skills, needle, thread and a heavy-weight fabric.
Although my youth was evolving around the '90s, I'm not a crazy denim fan. But my partner who walks dogs for living goes through a pair of jeans on a regular basis and even my "holes patching" evenings that I casually hold time to time can't give them more than a few more months (at best), so I have an abundance of ripped jeans at home 'for later'.
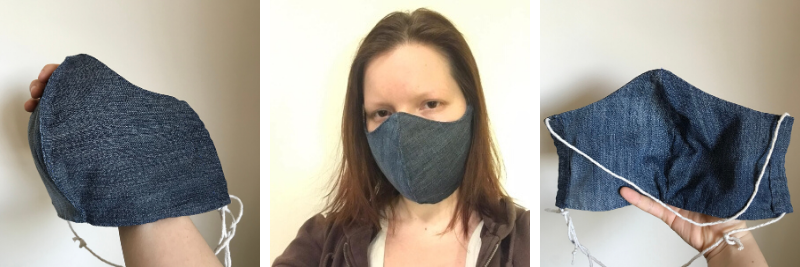
So I made yesterday a face mask from one of those old jeans (about a half a leg was used for one mask).
Let me show you how I did it.
Firstly, I found a face mask pattern online - please download it here.
My mum made the "rectangle type" masks for herself and my dad, but for this really heavyweight fabric, I decided that the "muzzle" pattern would give me more space inside for my nose and mouth.
I will quickly mention later how to make the rectangle type as well.
Face masks are mostly useful to protect other people from you, when you wear it. But...
...but there are reasons why you should wear a face mask during current COVID-19 pandemic:
1. You make an example an encourage others to wear a mask too
2. You can never know when you actually got infected, you may not have symptoms (yet) and you already are infectious to others
3. You are reminding others to keep their social distance - which is, together with washing your hands often and not touching your face unless your hands are clean, the biggest prevention of spreading the virus to and from you
We were using, so far, disposable masks that my partner The Primary Consumer buys when he's growing mushrooms indoor - especially when he works with the early stages of mushrooms (spores, growing mycelium, etc.) where sterility is really vital. Btw, this hobby is really useful when you are in lockdown, shops are empty because many people went into panic mode and bought everything - even freakin' last veggie burger - so we can happily harvest at home delicious shiitake, oyster mushrooms, lion's mane and I can't even remember what other species he successfully grew in the past =) (Oh, reishi, yes, but that's not that much for eating as rather for medicinal use. But still, amazing.)
Back to the masks... the point is - we can't use these disposable masks forever and they're also not that protective anyway. So I had to make some better ones for us.
Let's get to the face mask creation then!
This pattern (again, please download it here), that is from another blog, I found online and take no credit for it, says print at scale. Which meant for me and my A4 paper size printer that the pattern didn't fit on the paper. No problem, I rotated it 180 degrees and printed again to print the other part of the mask (you can easily rotate an image in practically any image viewer before you print it).
Cutting part:
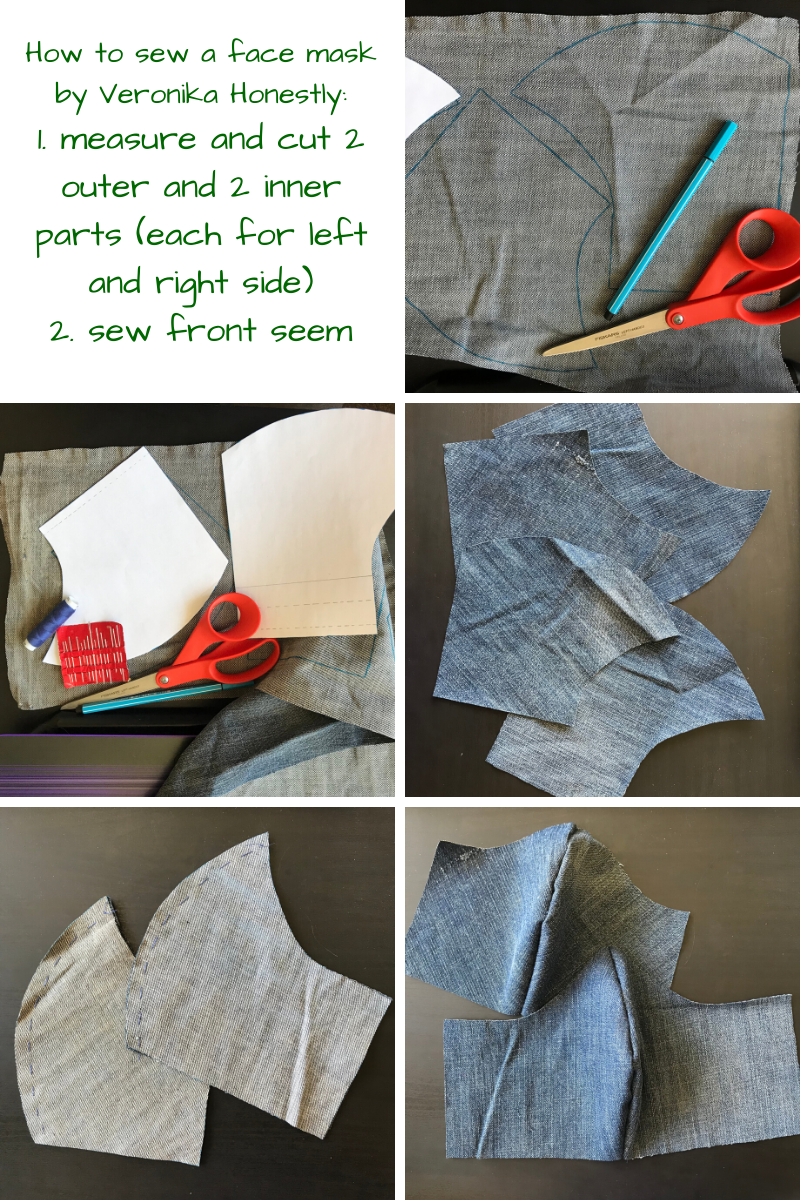
What you need to do first, is cut the pattern - both the outer (bigger) part and the inner (smaller) part of the mask - follow the solid lines for cutting. (Don't worry that much about the dotted lines, those are helpful to fit the two parts together and for folding hems but you can get it by the eye too.)
To make one mask, cut twice the outer part from the fabric and twice the inner part. Note: when you cut the second bit, turn the pattern so you get actually two mirror sides cut from the fabric (as shown below).
Sewing part:
Now there's the time for needle and thread. First bit would be stitching (just a quick stitch, it'll be reinforced later) the round "mouth and nose part" together from the back side of the fabric, so face both pairs (pair of smaller parts and pair of bigger parts) with front sides together (see in the infographic) to create two "tiara-like" long shapes - one will be shorter, one longer.
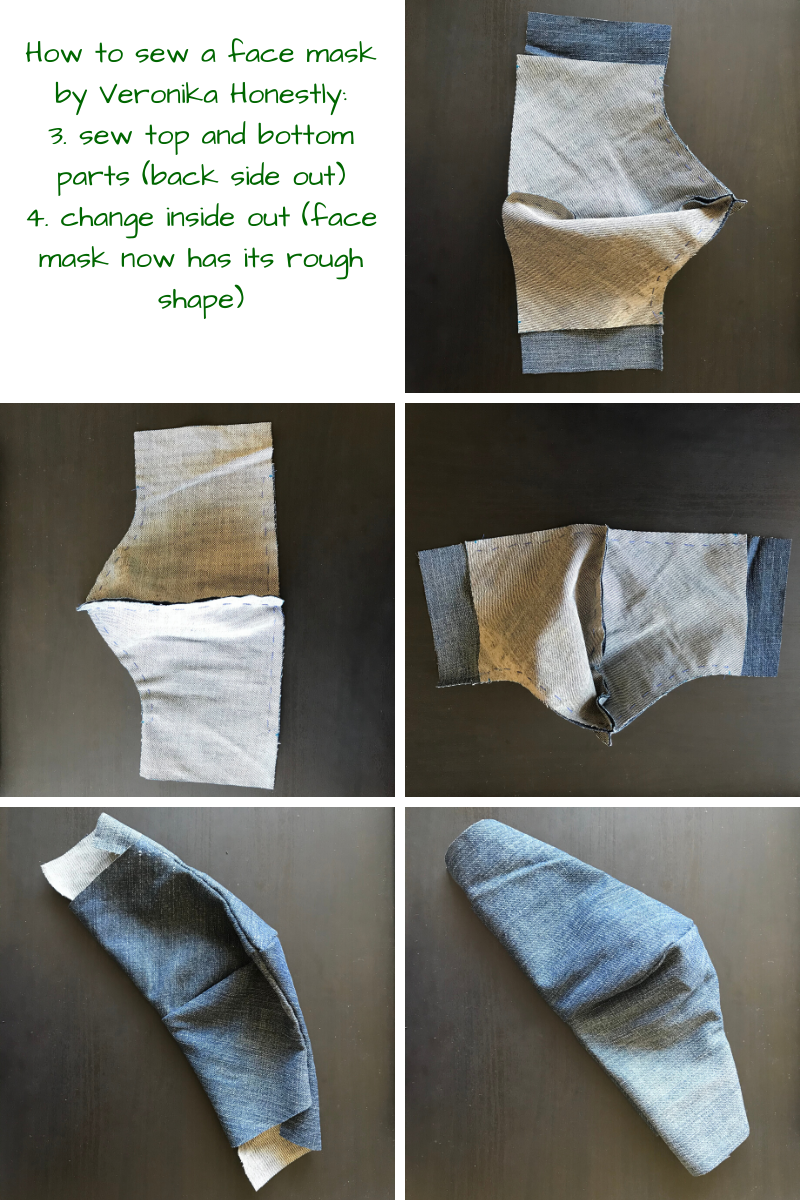
Both your parts, inner (smaller/shorter) and outer (bigger/longer) are now sewn in the middle. So you have two pieces looking like a tiara or whatever.
Now turn these two pieces with front face to each other (as in the picture below) and quick stitch outer and inner part together along the top and bottom.
This creates something that looks like a sleeve. Turn it inside out to see the front face of the fabric on both sides - when looking at the smaller, inner part of the mask as well as the outer, bigger part of the mask.
If you're not looking now at something, that looks like a sleeve (with a pointy bit as the middle top part where the bridge of your nose would be) with both sides fabric facing front, and all quick stitched seems nicely tucked inside of the "sleeve", something went wrong =) But worry not - if you're happy with your work, it doesn't matter that much - usually the front side of the fabric is nicer to look at and also to feel on your face, and tucked seems will not be going in your mouth or looking bad at the outside and will be protected from getting ripped easily... but otherwise not a big problem if your creation isn't perfect. Or you can try it again.
But hopefully, you got it right at the first go =) (It took me a while to figure out how to do it step by step - I've checked also with my mum who knows better, that I got the idea correct before I started sewing...)
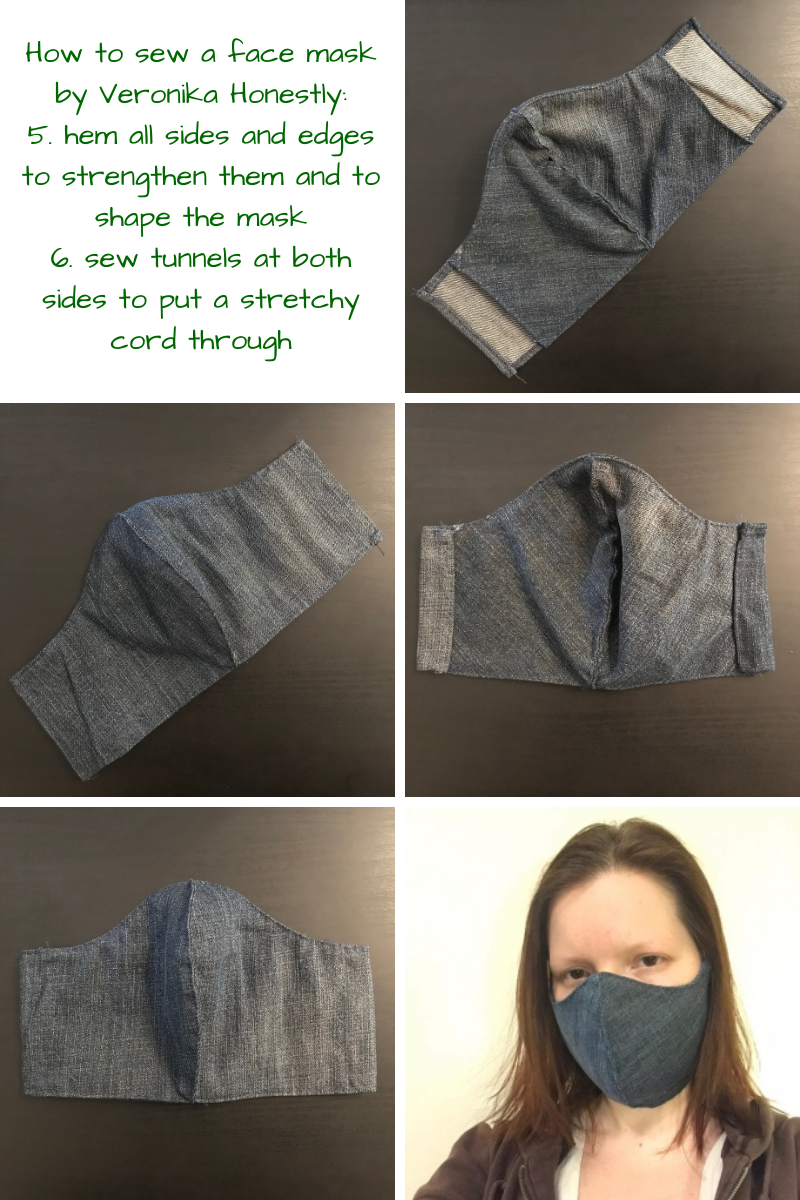
Now, all you need to do is secure-stitch all the seems and hem any leftover parts of the mask (so the fabric won't create unexpected fancy tassels and the mask will last longer =)
I've done the reinforcing, or secure-stitching if you want, by using the same technique as the quick stitch, just was more thorough and did the stitching denser and finer - very close to the edge of the seam. I tried to flatten the reinforcing stitching in the inside nose-mouth seam to make it comfortable to wear - so my technique was a bit different to other seams - you'll figure it out. Or maybe you can keep the inside seem that follows your nose and mouth line as is - if you did somewhat decent work on the first quick stitch part there so it won't rip easily.
Your "sleeve" has now flappy bits on each side because of the bigger/longer, outer part of the mask. Those need to be hemmed (you don't want any tassels later) and rolled towards the inner part and stitched to it to create tunnels on each side where the string will go through.
You're almost done!
The strings on this type of a mask should go around your head (sits best on the top) and below around your neck. It fits really tightly this way as it really hugs your face (yeah, I'm thinking about face-huggers too... I love the Alien movies =) Measure the strings to fit your needs - depending on how you want to secure it around your head/neck/ears...
Btw glasses go ON TOP of your mask - this way you won't get foggy glasses - years of cycling in a sport mask around London while wearing sunglasses taught me this trick.
And you're done!
Quickly, I'm also including the other type of mask that is easier to make (a quick diagram drawn at the bottom of the infographic too):
"My mum's face mask" is made of two (or even three layers if you wish). For two layers you need either two 20 x 20 cm squares of fabric or a rectangle 40 x 20 cm that you just half into a square shape (keep the folded part on top where it would sit on the bridge of your nose and under your eyes).
Hem all edges and sew them all around together to create a thick two-layer square.
Make three folds across the square - horizontally (picture of a finished mask also attached below - I don't have a pattern for this but it's easy to get the idea from a photo) and secure-stitch on both edges (any stitching will do but be thorough).
Now you have something that looks like a rectangle rather than a square.
You're almost done!
Strings for this mask go through the folds - one on the top and one on the bottom. Alternatively, you can decide to stitch the strings to the corners of the mask or create similar tunnels at the edges as it was done for the previous mask (but then you may want to cut the fabric for the mask rather wider about two and a half centimetres/an inch longer on each side before you start the work).
And as same as with the previous mask - measure the strings to fit your needs, the way you want to secure it around your head and neck or ears.
And you're done!
The other type of mask - my mum's creation: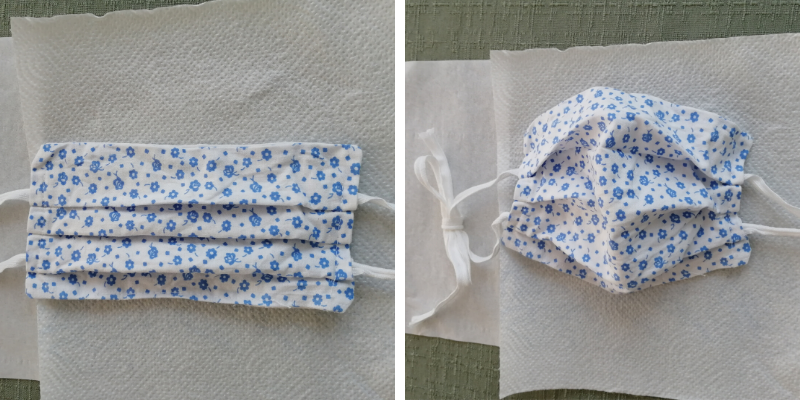
So, yes, the other mask is way quicker to make (and way easier to describe how to make) but I felt like I'd prefer a proper face hugger. It's your choice =)
Just wear the mask. It will help to tackle the pandemic quicker. Really.
Here is the quickly drawn diagram. Also, I apologise for my weird sewing language across this article as I'm not a sewing person at all (and I definitely don't know all the sewing related terms in English... =)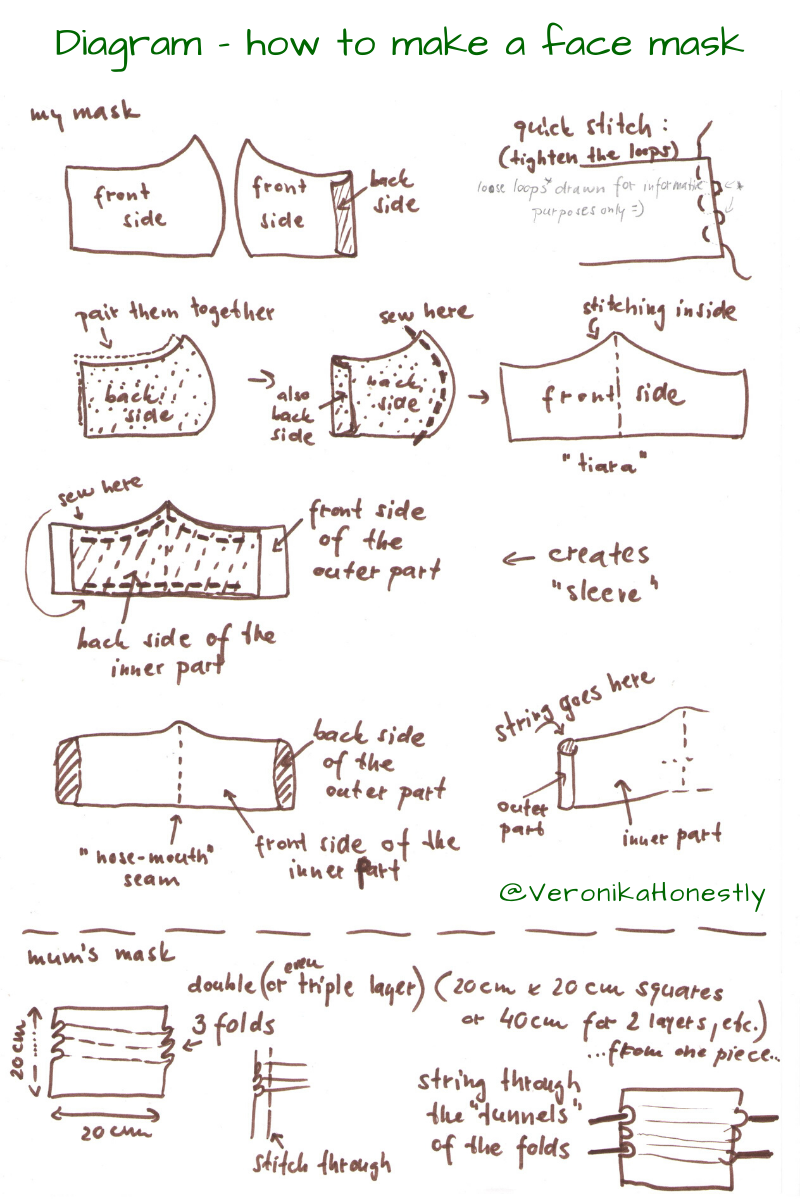
This mask doesn't have inbuilt filter pocket - any filter sits easily just between the mask and the face. Sewing an extra pocket on the inside part wouldn't be any problem either, should you want to have mask filter more secure.
In the end, in case you don't want to make your own mask for whatever reason (I can think of many reasons - including the fact that making just one mask took me whole evening - again, I don't have a sewing machine, all was done in hands), I know about many people making and selling masks on Etsy. I'm in several Etsy makers Facebook groups and face masks are the topic number one these days - because many people can't make their own (or simply don't want to), so buying a home-made mask is another easy option.
>> BUY HAND-MADE FACE MASKS ON ETSY <<
Stay home, stay safe - it's not a cliche, I really mean it.
And wear a mask when you're outside - you may be infectious even when you don't show symptoms.